April 30, 2006

Fearlessly Hot Zest!

While browsing for dried coriander leaves on the spice isle at the supermarket, I came across a new brand of spices; Zest foods, which had a very attractive and modern looking twist to it. One particular mix of spice which attracted my attention was one which said 'FIRE EATER' , the first thing that ran through my mind was; OoOoo that's pinky and amrit! haha...I brought the little adorable tin home out of curiosity.
I used it today in my Moroccan-ish roast chicken served with gourmet salad dressed in balsamic vinegar, buttered corn on cobs and baked crisp triangles flavoured with onions, garlic, cajun and philly.
The level of 'spicy-ness' was disappointing! (my housemates and I eat pretty spicy stuff) But the mixture was a really good combination of spices. The chicken tasted great with the spice rub, although I would say it's false advertising with the label on top saying 'fire-eater'. Didn't regret the purchase though. It's definitely something useful to have in the pantry to add a little 'zing' to food with bland flavours. Us Malaysians love our 'zing' *wink wink* haha.

April 29, 2006

The Party

It went great! Last night was heaps of fun! I was preparing for the party from dawn to dusk, but it was all worth it. Everyone loved the buffet spread and we had a few fun activities throughout the night. Guests brought crisps, wedges and drinks to help keep the party going after my food and pizzas were finished.

I had a good variety of food on the counter;

  • Vegetarian rice vermicilli noodles (for those who were vegetarian and Muslim)
  • sandwiches (ham+pickles+cream cheese and egg+tomato)
  • Sambal boats (Spicy Malaysian sambal on cucumber boats)
  • Cucur udang (A Malaysian snack made from prawn paste - deep fried with flour)
  • Malaysian prawn crackers
  • Salads (which nobody ate, haha)
  • garlic bread sticks
  • Everyone got to build thier own pizzas on Lebanese bread with an array of numerous condiments I had prepared. (I forgot to take pictures of the 20 over pizza's I was making throughout the party, my hands were dirty and I was too busy feeding everyone; anybody took pictures of thier pizza which I could have?).
Desserts were;
  • Butter cupcakes sandwiched with strawberry jam and iced with buttercream and tiny marshmallows cut in half as flower petals
  • Chocolate pots and baskets (I baked chocolate puddings in tiny ice cream cones to resemble pots and stuck several lollypops in the middle with piped buttercream flowers around the corners)
  • White chocolate puddings covered in milk chocolate toppings and strawberries
  • A chocolate fondue made with lindt milk, dark and cadbury milk bars melted with cream, milk and a dash of mocha coffee powder. Everyone loved this part of the party!
A special thanks to everyone who came by, Amrit; who helped clean the house, Pinky for having to do so much chopping and dicing! and Artem for doing the 'man-ly' electrical+ moving furniture chores and helping me make pretty stick kebabs of berries, pineapple and marshmallows. I hope everyone had as much fun as I did! I managed to keep within our budget of less than $40 per person between the 3 of us for the ingredients and party necessities and we intend to have more parties in the future! ps: Those who would like recipes for the food last night; email me some requests and I'll post them up for everyone.

April 28, 2006

Party cakes

As some might already know, my housemates and I are organizing a little get together for about 30 people tomorrow and everyone is to bring something to share. It will be just mostly friends of Amrit and Pinky..and some of my very dear friends. I; being the ever enthusiastic and excited 'chef' that I am, couldn't stop the many MANY brainstorming sessions to come up with something fun to make. I just love whipping up yummy treats for everyone; and tomorrow will be a great opportunity for me to do that in large quantities!
Anyway, for a sneak preview of what's going to be on the delicious buffet spread tomorrow.I will also be having a counter with condiments where everyone can build their own pizzas for me to pop in the oven. And there will definitely be a few savory Malaysian dishes to make the many Malaysian's coming tomorrow feel at home.
Well...I have said too much *sneaky smile*...i'll be ready with updates on how the party went and more pictures of the many scrumptious dishes on the buffet table tomorrow!

April 27, 2006

Baked semolina pudding


I hadn't had time to type in an entry in the morning, like I always do...however, I did manage to snap a couple of pictures of lunch before the girls ate. The picture on the left is a plate of Nasi Lemak- without the lemak!(I made it without coconut milk and oil) For those who are unfamiliar with this Malay term, it is actually fragrant rice, cooked in coconut milk and scented with lemon grass, cinnamon sticks and cloves. It is usually served with cucumber slices, fried anchovies, some sambal (this is a very spicy sauce cooked with ground chillies and spices) and topped with a fried egg!
For dinner, we pigged out on unhealthy KFC (it's been awhile since any of us ate out or had any sort of fast food. I was craving it! *guilty*). Anyway, I baked us 2 tiny semolina puddings to have for dessert. It seemed like a good idea to have pudding after KFC as it didn't have any cream/butter and the sugar content could be reduced.


Here's the recipe which serves 2; it's from my favourite celebrity chef; Nigella Lawson. I love her writing.
500ml milk
3 tbsp fine semolina
1 egg separated
2-3 tbsp sugar

1-2 drops vanilla essence
Cook semolina in warm milk on the stove top, by gradually adding in the semolina while continuously whisking the liquid in the pot. Cook for apprx 10 minutes until swollen and thick. Add in the egg yolk, sugar and vanilla essence. Whisk egg whites until stiff. Add a big spoon of egg whites into the pot of semolina to slacken the mixture, then gently fold the rest in. Pour the mixture into pudding dish/dishes and bake for 35-40 minutes until the pudding has risen and the top is brown and blistered. Serve with a drizzle of honey/fresh fruit. I had both! YUM!!

April 26, 2006

Pryaniki's for Priyanka (Pinky)

Just a couple of days ago; while in search of a Russian Pelmeni recipe, something else caught my attention. Along the long lists of Russian words I spotted = Pryaniki. The word reminded me of my housemate; Pinky , who's name is Priyanka. The ingredients and method seemed similar to those of spice cookies. I decided to jot down the recipe to try it out! I did that this morning.
They turned out YUM! Although the egg white glaze gave it a little 'funky' smell (I didn't really like it). I got my Russian buddy to come over to be my taste tester (as I have NO idea what Pryaniki's are supposed to look or taste like). His verdict was: yea...that's pretty close, but priyaniki's are supposed to be darker in colour and they have a thicker coating of white sugar glaze on top. ( I like mine with less glaze coating :P I don't really like how it smells!). I'm guessing the darker colour comes from the cocoa powder which my recipe did not include; I searched for some other Pryaniki recipes, and they had that included.
I'll probably make these again! This time, without the glaze and a prettier shape and design.

Here is my recipe with a few alterations:
1 3/4 cups self raising flour
1/4 tsp ground cloves
1/2 tsp cinnamon
1/2 tsp nutmeg
1/4 tsp ground ginger
1/4 baking powder
1 egg + 1/2 cup brown sugar beaten until thick and tripled in volume.
2 tbsp milk

Gradually fold in sifted flour and other spice ingredients into beaten fluffy mixture. Add milk. You should get a nice workable cookie dough. Shape and decorate as you desire. Place on greased baking sheet and bake in moderate oven (190 degrees) for approximately 15 minutes, till they brown on the top.
Glaze
: Beat 1 egg white until stiff. Boil 100ml water with 125 g sugar and pour syrup into egg white mixture. Beat until combined. Dip freshly baked pryaniki into glaze and leave on wire rack/baking sheet to cool.

I found a few very interesting facts about Pryaniki from www.russianfoods.com for those who would like to know more.
  • Pryaniki are ones of the most interesting makes of Russian cuisine. The name of Pryaniki comes from the spicy taste and smell which are achieved by special various additions. They could have different sizes, sometimes they made to order Pryanik up to several poods ( pood is old Russian measure, 16,38 kg (36 lb) and decorations. There were two kinds of Pryaniki - painted and printed. Painted Pryaniki are decorated with nuts, berries and candied peel. Real dynasties were involved in making forms for Pryaniki. Sometimes Pryaniki were made from two layers with fruit jelly or jam between. Expensive Pryaniki were always covered with icing. Pryaniki are one of the favourite food. They were always offered to guests, relatives. But there were "leavingaway" Pryaniki that were given to late guests and, having received such Pryanik, they had to leave the house immediately. They baked Pryaniki to any occasion and the quality and the decoration were perfect.
The English on the translation is a little strange, but I suppose we all get what it's trying to say ;)

April 25, 2006

WahTanHor

Simply put, Wah Tan Hor is Chinese wok fried noodles topped in a silky egg laced sauce cooked with meat and condiments. I made barbecued chicken (chicken char siew) this afternoon as meat. I first learnt to make Wahtanhor from watching the old lady at my high school canteen who used to dish plates of noodles out by the trays! She had a very large wok and I enjoyed watching her flip and stir as the dangerous flames rose up the sides from the enormous stove top!
Seafood is usually used in the egg sauce, however; seafood isn't usually included on our grocery lists (too expensive and hard to keep fresh) so *shrug* ; Chicken 'charsiew' is good too!
I opened the pack of rice noodles i had set aside for the dinner and was shocked to find moss looking green spots covering the middle strands! Mortified and half way thru my cooking, I decided to just use beehoon (rice vermicilli) I had left in my pantry. Tasted just as yummy!

Russian Pelmeni

After a tiring night out with my housemates last night, I woke fairly late this morning and decided- since its a public holiday and all, ill invite a guest over for lunch. My friend -Artem is from Canada but of Ukrainian roots and being away from home for so long; he has missed his mom's yummy Russian dishes. I felt a little awkward at first as I myself have never eaten Russian food, and today....I'm MAKING it! One of his favourite dishes is Pelmeni. Click here for a full definition of what that is, basically; its a dumpling. I suppose as Russia is a neighboring country of China, the culinary diversity eventually spread; and we somehow have similar dumplings made by Chinese people called 'Gau ji' click here for a picture. The only difference is, chives and different spices are added into the filling to give it a Chinese taste. Wrapping the Pelmeni reminded me of my childhood days, when I used to help my mom and aunts wrap wan ton's with similar dough. Here is the recipe for Pelmeni; try it! ....I personally loved it and Artem said it was very similar the original Russian Pelmini from stores. It was a LOT of work! My forehead was damp with sweat, kneading half of this recipe! Making a silky thin skin of dough and flavouring the meat on your own definitely beats the ready made ones and it's definitely more satisfying.
2 cups plain flour and a little more for flouring the surface and your hands
1 cup milk
1 ts salt
1/2 tbsp vegetable oil
1 Large egg
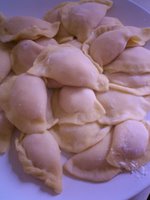
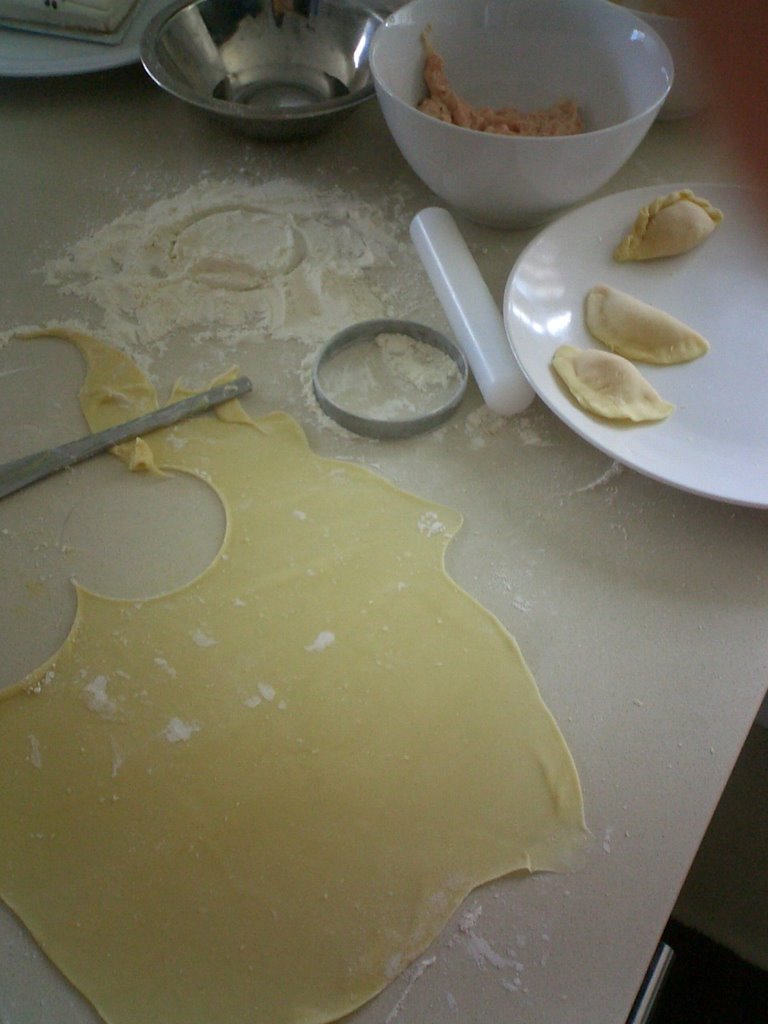
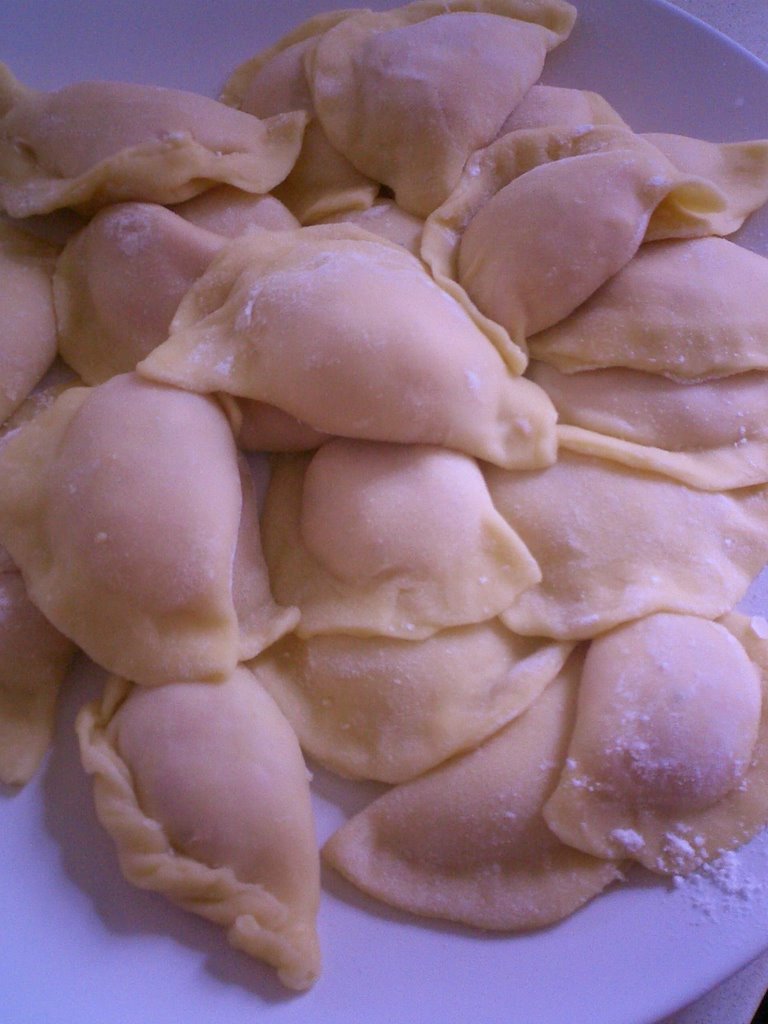
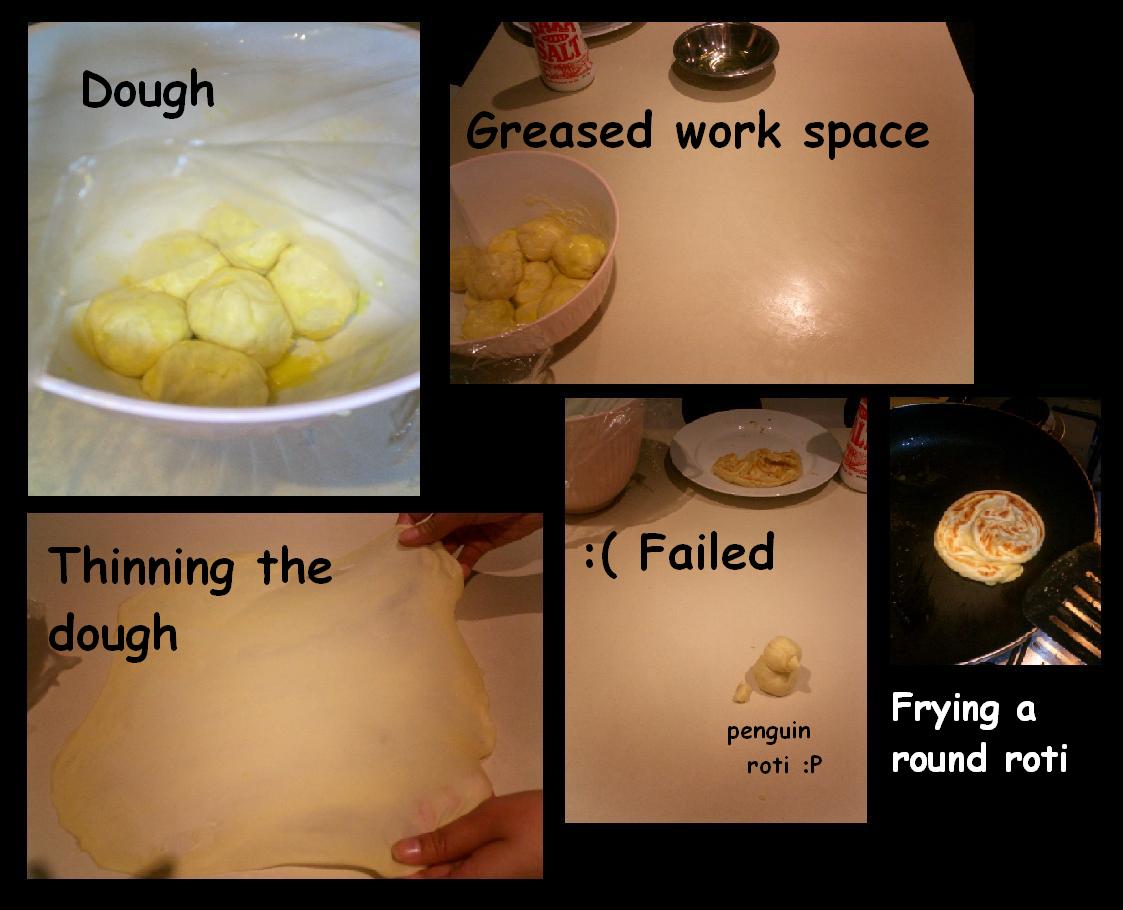
*Mix and knead until combined , it may seem a very sticky at first and unworkable but it will eventually look right, as you knead it on the floured surface, knead it and mix it about with a fork or knife if u must (like I have done in the picture). Knead until it becomes fairly smooth and elastic. This takes a LONG time....dont give in half way through, it isn't like kneading pastry dough. Roll it out and cut out little circles. Fill the pelmeni, pinch the corners to make sure the meat is 'locked' in. Make sure there aren't holes in them, as the water can dry up the meat inside. Tip: put lots of flour in between them when you stack them on one another; they tend to stick.

Filling:
500 minced pork or 250 pork+250 beef (combination is up to you)
1 onion diced
salt and pepper

*Grind all filling ingredients and add about 2 tbsps of milk to moisten the meat.

I made 2 variations of the Pelmini.

1. Boil in 1 litre of boiling stock+salted water for about 10 minutes, depending on the size of your dumplings. They will float up when they are cooked. Serve with sour cream/vinegar/ a big dollop of butter (for authentic Russian-style-Pelmeni)
2. I cooked a second batch Japanese Gyoza style on a frying pan. Add oil to to coat the pan, shallow fry bottom of Pelmeni's till they turn golden. Lower heat, add 4 tbsp's water mixed with 1 tsp stock powder into the pan (it will sizzle) and quickly cover to let the steam cook the rest of the Pelmeni. Remove when they are cooked through. - I liked this version better, as it had a nice crisp bottom! Not as healthy though.
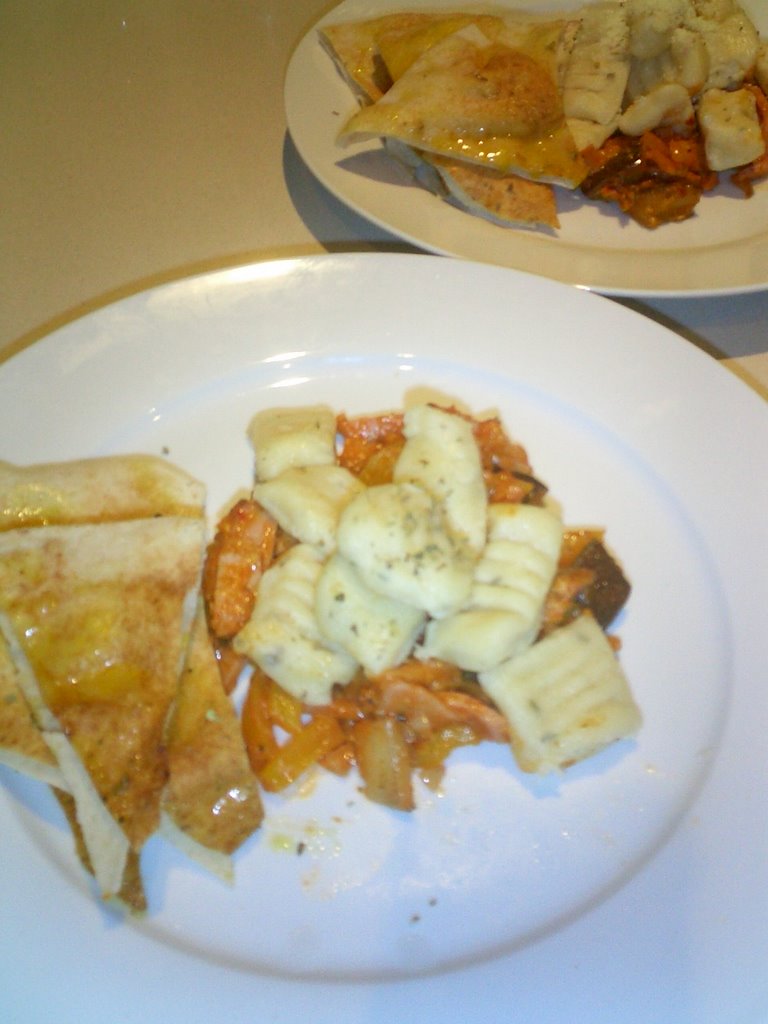
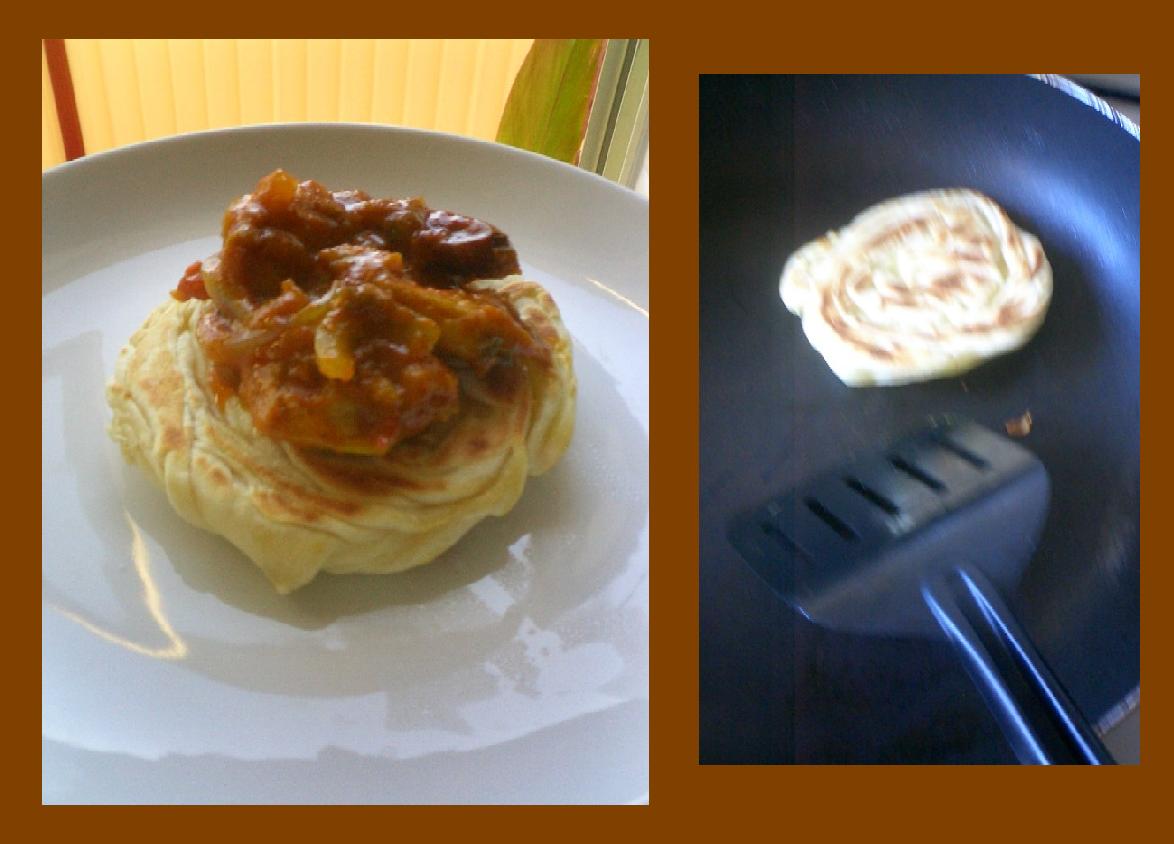
*hidden in this photo above, is a 'Malaysian-looking-pelmeni, spot the CurryPuff Pelmeni ;)

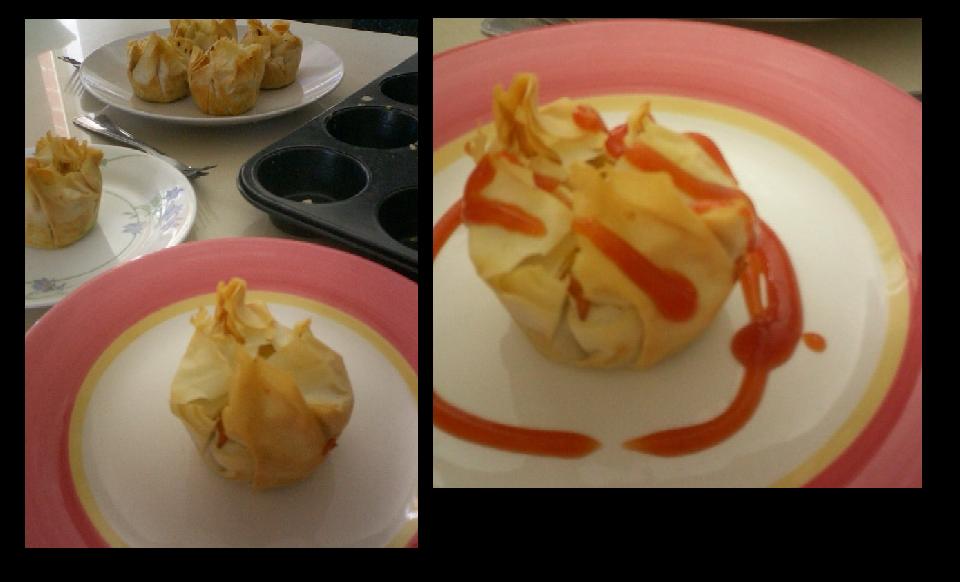
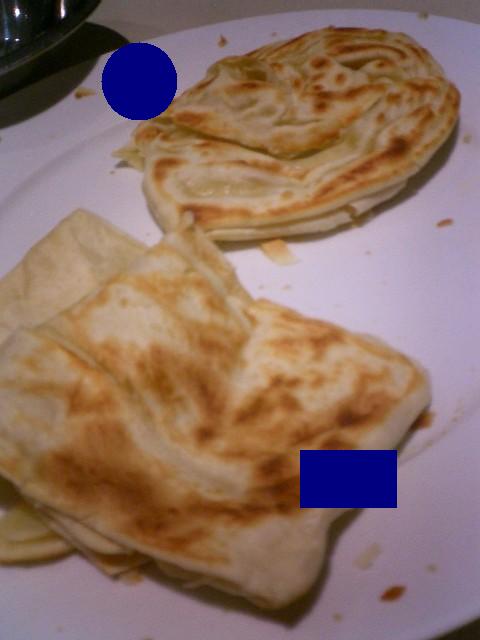
My friends and I were so excited to try the Pelmini's that we forgot to take a picture of the cooked batches! :(

April 24, 2006

NintendoDS cake - (Mexican filo puffs and Malaysian claypot chicken rice)

I had some fun this morning, made a little white model of the Nintendo DS from 2 pieces of butter cake attached with royal icing and covered with a little gum paste. It was made specially for a good friend of mine, who loves the Nintendo DS but unfortunately does not own one. I though this would be a cute replica of what I can afford. It surprisingly didn't take me long to form this little game pad, although it was a little fiddly it's shapes are pretty simple to shape.

Lunch was a simple filo pastry crusted Mexican bean filling topped with melted mozzarella. Tasted really nice with a drizzle of chili sauce!


edit: Last night my mommy dearest shared a very fast- microwavable dish with me, I tried it for dinner today- omitted the salted fish (improvised with fish sauce and dried prawns) and mushrooms (eewwk i hate mushrooms!) :P hehe. It came out yummy!!!...like how my dearly missed mommy used to make at home *feels all warm inside** click on the picture to enlarge image

April 23, 2006

Baking with company

I had a lovely lovely time baking today. It was a little buttercake covered in milk chocolate and pink icing for a very dear girlfriend (the chocoholic housemate @ medicine student) who is currently stressing herself out of her mind for an exam tomorrow. Me and my pretty-miss-pinky decided to make her an Extremely belated birthday cake; just for the sake of a candle blowing ceremony as we knew she would be needing that wish right now. It is a little childish; I know...but I guess it's something to cheer her up, and something to send thoughtful wishes of good luck from the both of us. She was falling asleep when we waltzed into her room with happy tunes "Happy-birthday" and she woke up, half conscious saying; My...Birthday?...Is it my birthday?!...It was funny, I wish I took a video! Although I know I wouldn't need it as these are memories of my dear friends and life at University which will probably stay with me for years to come.
I strongly recommend baking with a friend...or even friendS, forget the old saying "too many cooks spoil the broth" or in this case, cake/cookies/any other yummylicious-desert-type-thing, forget the calories, forget the trouble of cleaning up, because it's not how delectable it tasted or how good it looks but the fun times you get to share with people who mean a lot to you. Have fun and make "booboo's", it's all for laughs at the end of the day.

Homemade ricotta gnocchi

In the evening my housemates and I were still stuffed from our weekly Sunday dim-sum brunch at Kam Fook Westfield, Bondi (they serve the best prawn dumplings-'Har gow', egg tarts, and particularly on Sunday they have my favourite grass jelly desert with watermelon pieces!). I decided to make a simple and light dinner; ricotta gnocchi laid on a bed of aubergine (brinjal) and bacon cooked in a tomatoe base pasta sauce. The gnocchi was fairly simple to make, and it went well with the sauce as it absorbs alot of flavour. Here is my recipe for approximately 4 people;
250g ricotta cheese
1/4 grated parmesan
1 egg lightly beaten
3/4 cup plain flour
1 tbsp parsley flakes
2 pinches of sea salt (I used Maldon sea salt)
and cracked pepper to taste
Mix everything in a large bowl until well combined, lightly flour a flat workspace and roll into a long rope, Cut into 1cm chunks and press top with a fork( dab the fork into flour before pressing). Cook in salted boiling water (as you would for pasta) for 1-2 minutes or until the gnocchi rises up to the surface. Cook in batches- do not overcrowd the pot. Serve with your favorite sauce combinations and sprinkle some grated parmesan on top!For desert, I made a nice tangy rhubarb compote with cinnamon,nutmeg and brown sugar , covered in with a thin layer of vanilla yogurt and drizzled fresh Canadian maple syrup on top~!! Sounds so easy and simple, and its simply YUM!!!...try making it with berries if rhubarb is hard to find.

April 22, 2006

Roti Canai

For the past few days, I have been doing extensive google research on making Roti Canai. For those who would like to know what this is, click here. It has been more pain than pleasure and I'm running out of plain flour. Anyway, I decided to update my blog with my roti canai adventures and hopefully get some feedback from those who have tried and succeeded! The recipe I first started off with a couple of days ago was from Kuali-Malaysia by Amy Beh. It came out pretty tough and not thin and crisp on the outside. It was decent though, edible; but still not authentic roti canai! I tried another recipe today which did not include milk; from Malaysianfood.net . As my skills in thinning the dough got better, I was able to make the roti this time with more layers and air trappings for a flakier and crisp roti. The second recipe gave a softer bread-like texture in the center when cooked but in my opinion, the first recipe from Kuali was more workable and tasted more canai-like. I had a few unsuccessful attempts to thin the dough by flipping it and stretching while spinning the dough (like how the mamak's in Malaysia do it) -click here, however, instead of the dough forming a larger circle, it kept shrinking while the corners overlapped each other. I finally decided to just stretch it on the counter with my fingers. The problem with learning to make roti canai is, the amount of dough you waste! After working with one ball of dough, it cant be re-kneaded and stretched out again; as it becomes tough and dry.(like this little penguin I shaped out of frustration). I wasted many many little balls of dough while trying to get the stretching method right. To those lucky ones back in Malaysia; don't take the Mamak roti canai for granted, it involves more than you think it does! An authentic plate of roti from a Malaysian mamak will never be the same for me.

It tastes like the ocean

A post to display my common careless and unskillful cooking techniques. This plate of noodles tastes like they were cooked in sea water. Almost inedible; I could not taste anything in the noodles but SALTY! *note to self* put a small spoon in the salt and seasoning jars. Tipping over the container just isn't a good idea! I figured the root of my problem with accuracy in cooking is my laziness and inability to remind myself to taste the food before dishing it out! Sometimes I overlook important details and its disappointing because cooking something yucky just ruins my day *sob*

Pinky is home!!

My darling friend and housemate -Pinky, will be returning home from her trip to Adelaide today! I've missed her dearly and decided to make a chocolate cake to celebrate her home coming. I modeled a little cartoon girl with a pink frock out of sugar paste (I know...it looks a little deformed, i definitely need more practice with making human models out of sugar). She loves melted chocolate toppings which drizzle down the corners of the cake; so I did that as well. The spray of stars and wording was done with piped royal icing and the little flowers the girl is holding are lavender flowers from my herb garden. The bottom of the skirt which looks puffed up is a cut layer of cupcake I had made earlier in the week. I laid the model down on the piece of cupcake and let it lie down on its skirt which was flared up with thin layers of rolled out pink sugar paste and embossed with a wooden skewer around the corners.

April 21, 2006

Berry pancakes

About 2 weeks ago, I tried making stacks of mini ricotta pancakes which turned out Amazing! This morning with no ricotta cheese in the fridge, I went back to my old recipe stash and dug up my buttermilk pancake recipe; mixed up a smooth batter, added a dash of vanilla + brown sugar, and sliced some fresh berries for something a little different. They turned out decent I guess. They taste like pancakes...ordinary pancakes, just with the flavour of strawberry juices infused within them. They weren't as satisfying as compared to the ones made with ricotta cheese. It is still fresh in my memory how light and fluffy those tiny warm pancakes were, they melt in your mouth with amazing texture and a subtle taste of ricotta cheese. MmmMmm...*sigh* is guess there is no turning back to the old pancake recipe which once upon a time was great.

This is how the berries were put in place on the pan. Position the sliced berries before you flip the pancake over, this works well with peaches as well :)

Here I made a variation for my dear housemate-Amrit who does not have a liking for sour berries. I omitted the berries, spread and stacked hers with layers of jam and spilt a mandarin orange slice thru the middle to create a tiny shape of a heart.

April 20, 2006

Butterscotch Cheesecake

Right after dishing up pasta for dinner, I decided to have another 'baked-cheesecake' practice session. This time, instead of baking milk chocolate again, I made a butterscotch cheesecake with a gooey praline topping, toasted walnuts, chocolate swirls and strawberries. The base of the cheesecake was assembled with Arnotts milk cookie crumbs, crushed walnuts and butter. I bet those who frequent my blog would have noticed that I have this habit of taking my favourite recipes; crossing-my-fingers, omitting and throwing in a couple of different ingredients which I "think"would go well with the original recipe and praying that they turn out YUM! I'm not sure if it's a good habit to keep or if its advisable to follow tried and tested combinations from professionals. It isn't that it is impossible to find the recipe for a specific flavour/content that tickles my fancy, but it's just something I do because i trust my 'base' combination of ingredients and want to work from that. Most of the time, the recipes turn out well, and I quickly jot down what I've derived; but every so often, It just doesn't hit the spot. There are pro's and con's to my "hoping-it-turns-out" technique, you get to create many recipes which specifically satisfy your tastebuds and it gives the recipe your personal touch; however, it can sometimes be frustrating and a waste of ingredients when the 'rejects' are inedible. I've got a lot to learn in terms of cooking, and I'm not too sure this strange habit of mine is a good way. For as long as I can recall, being consistent and accurate is something I've had trouble with.
EDIT: Here is my recipe for the cheesecake, as requested by a dear friend; Happy birthday Wendy Wu!
1 cup crushed Arnotts milk cookies
1/4 cup chopped toasted walnuts
1/4 cup butter (melted)

24 oz softened cream cheese (about 3 packs of philly)
1 cup firmly packed brown sugar
3 eggs
1 cup cream
dash of vanilla essence

1/4 cup brown sugar
approximately 3 inch cube butter

Make crust by mixing first three ingredients and pressing into base of 9 inch springform cheesecake tin. Leave to set in refrigerator while you make the filling. Beat cheese until smooth and creamy and gradually add in the sugar. When well combined add in one egg at a time; beating well after each egg. Add cream and vanilla and beat until smooth. Pour into prepared cookie base.
Bake at 200 degrees for 10 mins and reduce to 180 and bake for another 60-80 minutes. If the top begins to burn, cover top loosely with foil. Remove when center in set (it should still be a tiny bit wobbly) . Leave to cool completely before lightly removing it from the pan. Should take about 2 hours or more.
To make the topping, melt sugar in butter over the stove and stir till well blended and smooth. Spread generously over cooled cheesecake and refrigerate for at least 2 hours or preferably overnight. Decorate as you desire with berries/walnuts/chocolate swirls. Store in refrigerator.

On a random note: this picture is to remind everyone how scrumptious a very simple and hearty plate of bacon and eggs on toast can look early in morning. Tip: always butter your toasts before toasting for a nice brown gleam and dust eggs with cracked pepper and fresh herbs for a lovely tempting aroma! It's always nice to wake up to the smell of toast and eggs for breakfast; I'm sure my housemates love it! And all can be done in less than 30 minutes (im not kidding, this includes washing up as well!). It looks like a WHOLe lot of work...but ill break it down for you on how I easily do it with one eye still half asleep. You don't even need the oven or a mini toaster, just one flat based pan! 1) butter bread, throw onto pan butter side down, remove from pan when toasty on both sides-should take less than 4 minutes 2)grease pan lightly and cook bacon till crisp-remove, will take 6-8 minutes; use medium high heat (or just microwave it if you're lazy like me!) 3) cook eggs with remaining oil in pan however you wish! Season and serve! Rinse pan, eat, wash plate and jump back into bed for a few extra minutes of twirling around!

April 19, 2006

Strawberry and Chocolate Souffle


My first attempt at souffle today turned out perfect! Starting off with a good banana souffle recipe, a pint of juicy strawberries, and some melted milk chocolate, I had a go at making my own favourite flavour; strawberry chocolate! It turned out light and fluffy on the inside and the combination of strawberries and chocolate was divine. For an exact definition of what a souffle is, click here.

I made the souffle as an accompaniment to dinner; grilled chicken with spicy sesame dressing served with garlic toast, kumara chips, and potato soup with bacon bits. This is probably the first soup which was given the thumbs up from my housemates, it was yum! link here for the recipe of the soup from Kristen. (thanks Kristen) Kumara chips were made by peeling and slicing the kumara with a vegetable peeler; creating thin layers. Scatter onto a baking tray, drizzle with few drops of olive oil and freshly ground black pepper, and pop under the grill till they turn crisp! It is a healthy way of making chips and makes a good side dish for grills and steaks.

April 18, 2006

Ayam Masak Merah

"Hey, how to make ayam masak merah?", my dear friend; Yan from Melbourne enquired. I had a chance today to cook and note the proportions I use for my ayam-masak-merah recipe. It isn't exactly the Ayam-Masak-Merah Malay Kampung style, but it is my version of it, which taste almost identical. I use ingredients which I have ready in my pantry and try to improvise when it comes to herbs which are hard to buy here in Sydney. For those who are confused with the term "Ayam-masak-merah" I've been going on about; it is a dish from Malaysia originating from the Malay people which if directly translated; would mean red cooked chicken. Ayam=chicken, Masak= cook, Merah= red. The bright red colour comes from the tomatoe paste and ground chilies, it is fairly spicy. It may look like just another curry, but its taste is in fact very different from Indian curries. The broth is discretely sweetened with sugar and carries a tinge of sour from the tomatoes.

Here is the recipe, enough to serve 4;

2 inch cube ginger peeled and diced
4 tomatoes
3 large red chilies
3 shallot bulbs
2 large red onions sliced into thin rings
5 pieces skinless chicken thighs sliced. (marinade in salt, cornflour and tumeric powder, set aside for at least 30 minutes)
1 cinnamon stick; broken into half
1 stalk lemon grass chopped lengthwise
3 cloves
4 dried chilies
2 tbsp chili paste/sauce or ketchup (if u don't like it too spicy)

Pound or grind first 4 ingredients. Fry chicken in a wok under high heat in corn/vegetable oil, until they corners turn brown and crisp. Remove and set aside. Remove some oil from the wok and add in onions and last 5 ingredients. Stirfry till fragrant. Add in ground tomatoe paste and fried chicken, and stirfry to coat. Season with salt and sugar.
Serve with spiced rice/toasted sesame seeds/chopped green shallot leaves.
Top with fried bull's eye egg! YUM!

This version of Ayam masak merah really has my own personal Chinese flair to it, but it does taste like the Malay ayam masak merah we get back home. The sesame seeds and shallots leaves are a bit of an oriental touch, but hey; this is afterall the best thing about being Malaysian; it's a multicultural society!

Edit: For breakfast this morning, I made Roti canai to have with the leftover ayam masak merah from yesterday. It turned out better than i expected it to, but the recipe definately needs more research and personal alterations. It dissapoints me everytime I try a recipe online and it doesn't turn out well (I guess the comment my lecturer made about sources online being not too dependable applies here for recipes as well). Anyway, I'll probably make a few changes and try it again next week; this time with margarine or ghee instead of just using spread, that is probably another reason why it didn't have that Mamak roti 'kick'. Not bad for a first time though. My dear Amrit loves Malaysian food and she enjoyed it :).

April 17, 2006

For a very special girl


Today's post is dedicated to one very special and dear childhood friend whose birthday I somehow unthoughtfully managed to forget! *whacks top of head with frying pan* I deserve it, I'm so sorry! I am as bad with birthdays and names as I am with making meringue! (and my meringue is vveryy verryyy bad, I have never made a SINGLE successful batch in many many attempts). Anyway, back to the birthday of my darling friend who has been so sweet the past 15 years, I decided to make something I knew she would love; and ate it!....on her behalf :P (Sue ann, ill make you a batch when im back in Malaysia...I promise! *muah*). I was aware of her love for everything chocolate from childhood days when she taught me how to eat Milo in a thick gooey form; made from heaped tablespoons of Milo and tiny drops of water. This white chocolate pudding which ozzes out hot white chocolate from the inside and is covered in a rich warm layer of chocolate ganache just reminds me so much of you! Ann, you've been a wonderful friend through the years and you've helped shape me to be the person I am today. Thanks for filling my childhood with amazing and unforgettable memories and thank you for making an effort to keep our friendship going (unlike so many 2 year friendships i've had)...Its been great having you in my life; my petite, beautiful, charming and talented Sue Ann.

*wipes tears* Okaay, back to the topic of food and cooking; I made baked stuffed tomatoes in crusted mozzarella served with a ham and cheese crepe and toasted Parmesan garlic bread slices.
Garlic bread is one of the many favourites in this household, It is my favourite to make as well! Its so easy with the McCormick garlic powder which works wonders on good quality butter and crusty bread. I usually sprinkle my buttered bread with the garlic seasoning, oregano flakes and a small dash of Parmesan to give it a cheesy flavour. The tomatoes were stuffed with minced meat cooked in caramelised onions, garlic, chili flakes, Lea&Perrins and topped with melted mozzarella and breadcrumbs. The tomatoes help keep the meat moist in the oven and creates a soft warm shell for the flavoursome juices from the cooked meat inside. I liked it, it was YUM! Will definately try it again...next time, ill stuff a capsicum!

April 16, 2006

Love thy neighbour on Easter Sunday!


We woke this morning to find a strange white bag tied up with pink streamers at our doorstep. Out of curiosity and a little fear, we opened it to discover that they were Easter presents from our lovely neighbour next door! *It must have been that bunny cake I gave him yesterday!*I thought to myself. Anyway, under the wrapping and stickers were 3 different coloured tea mugs; one for each of us. I decided to bake something nice for our thoughtful neighbours. (gossip: i heard he is a lecturer at our uni, and his wife is a German lady) :P.
Anyway, here is what I created with what we had to spare from our weekly groceries. I baked my mom's famous almond cherry cake with barely enough cherries (I didn't have enough) and I did have to run out to the gas station to get some Easter eggs to fill the nest. I spooned a layer of thick milk chocolate ganache and stuck on crumbled Flake bars I had left from my Panda bear cake to form a nest.
It's pretty adorable I must admit, and I think im getting better everyday with ideas on cake/cookie decorating etc. etc. *proud smile* I hope our neighbours like it!